Generative AI using eGPU on Slackware Linux
2882 words, 14 minutes
I recently got interested in so-called Generative AI. I tested a few things like ChatGPT, Dall-E or Bing Image Generator. Then I discovered things could be self-hosted rather that using Cloud resources. But I am no gamer, nor do I want to have a full machine eating 200W all day to run my little experiments.
I decided I would use my new Topton GM1 Thunderbolt port and connect an eGPU to it. This way I can simply turn it on and off when needed.
Hardware
I used two different machines:
- A ThinkPad X280 including two Thunderbolt 3 ports ;
- A Topton GM1 including one Thunderbolt 4.
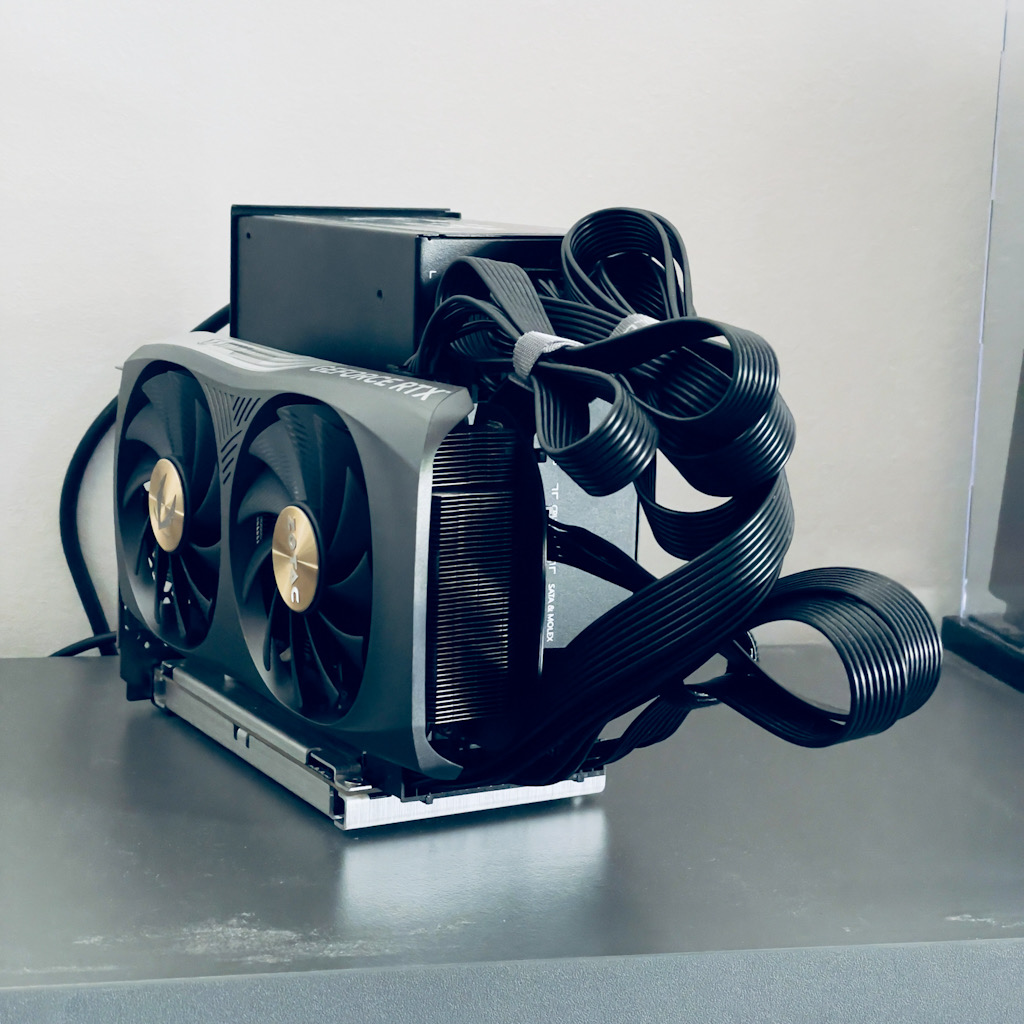
The GPU is choose is a ZOTAC GAMING GeForce RTX 4060 Ti 16GB
AMP
.
I went for it because it is compact, it doesn’t advertise plenty of
power consumption, it provides 4352 CUDA cores and ships with 16GB of
VRAM.
I did try the ADLINK Pocket
AI
and it was an improvement compared to CPU rendering. But its 4GB of
VRAM is really short for the software I tested.
From what I read, the nearly most important thing is VRAM size. So I
looked for GPUs with at least 8GB. Also, people seem to recommand RTX
3060, RTX 4060 Ti or RTX 3090 - in ascending order of performance/price.
For the record, here’s what I grabbed to help me choosing:
| VRAM | CUDA cores | Power | Dimension | Prix | |
|---|---|---|---|---|---|
| ASUS DUAL NVIDIA GeForce RTX 3060 V2 | 12GB | 3584 | 650 W | 20x13x4cm | 270 € |
| MSI NVIDIA GeForce RTX 3060 Ventus 2X | 12GB | 3584 | 550 W | 23x12x4cm | 322 € |
| ZOTAC Gaming GEFORCE RTX 3060 Twin Edge | 12GB | 3584 | 600 W | 23x12x4cm | 313 € |
| PNY GeForce RTX™ 4060 Ti 16GB Verto Dual Fan | 16GB | 4352 | 491 € | ||
| ASUS DUAL NVIDIA GeForce RTX 4060 Ti OC Edition | 16GB | 4352 | 650 W | 23x12x5cm | 523 € |
| Zotac Gaming GeForce RTX 4060Ti AMP | 16GB | 4352 | 500 W | 23x12x4cm | 534 € |
| ASUS GeForce RTX 4080 Super (Noctua OC) | 16GB | 10240 | 850 W | 31x15x8cm | 1 400 € |
| GIGABYTE GV-N3090GAMING OC | 24GB | 10496 | 750 W | 32x13x5cm | 1 500 € |
| MSI RTX3090 Gaming X Trio | 24GB | 10496 | 750 W | 32x14x6cm | 1 700 € |
eGPU.io seems to be a reference when it comes to eGPU things. From their “Best Of” selection, I first choose the Razer Core X ; but it was not available before weeks. So I finally went for the EXP GDC TH3P4G3.
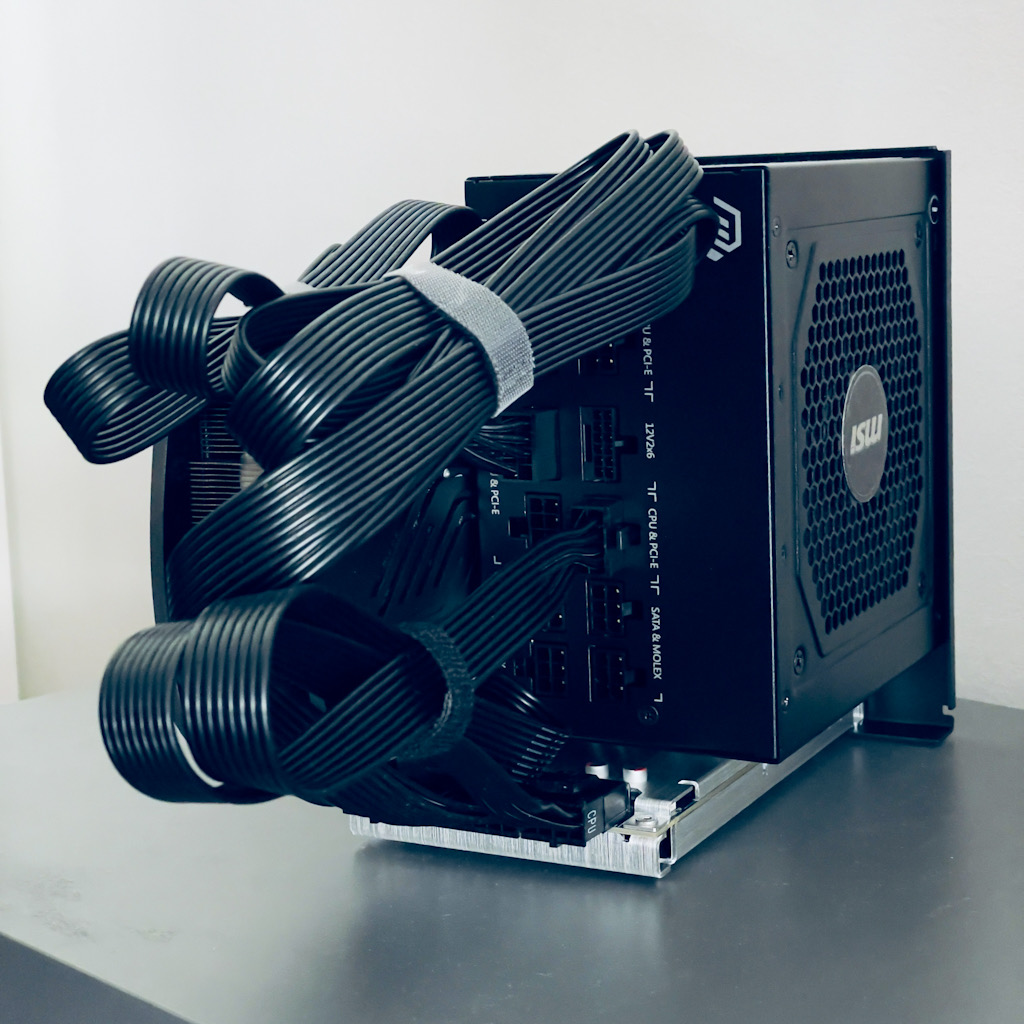
Given the eGPU docking station I choose, I needed a PSU. I went for the MSI MAG A750GL PCIE5 . I choose it because it is able to provide 750 W, because it is Gold, because it has a large fan and because the cables are modular ; I only have the required cable pluggued and no more. It was supposed to be a silent PSU, compared to be quiet!. I don’t know how it compares but it is definitively not silent. It’s about the same noise level as a ThinkPad X1 Carbon when you watch a video with Firefox… That said, the sound is quite deep and not that much annoying. Spoiler Alert: now that I have done my testings, I should have gone for a 400 W Fanless PSU.
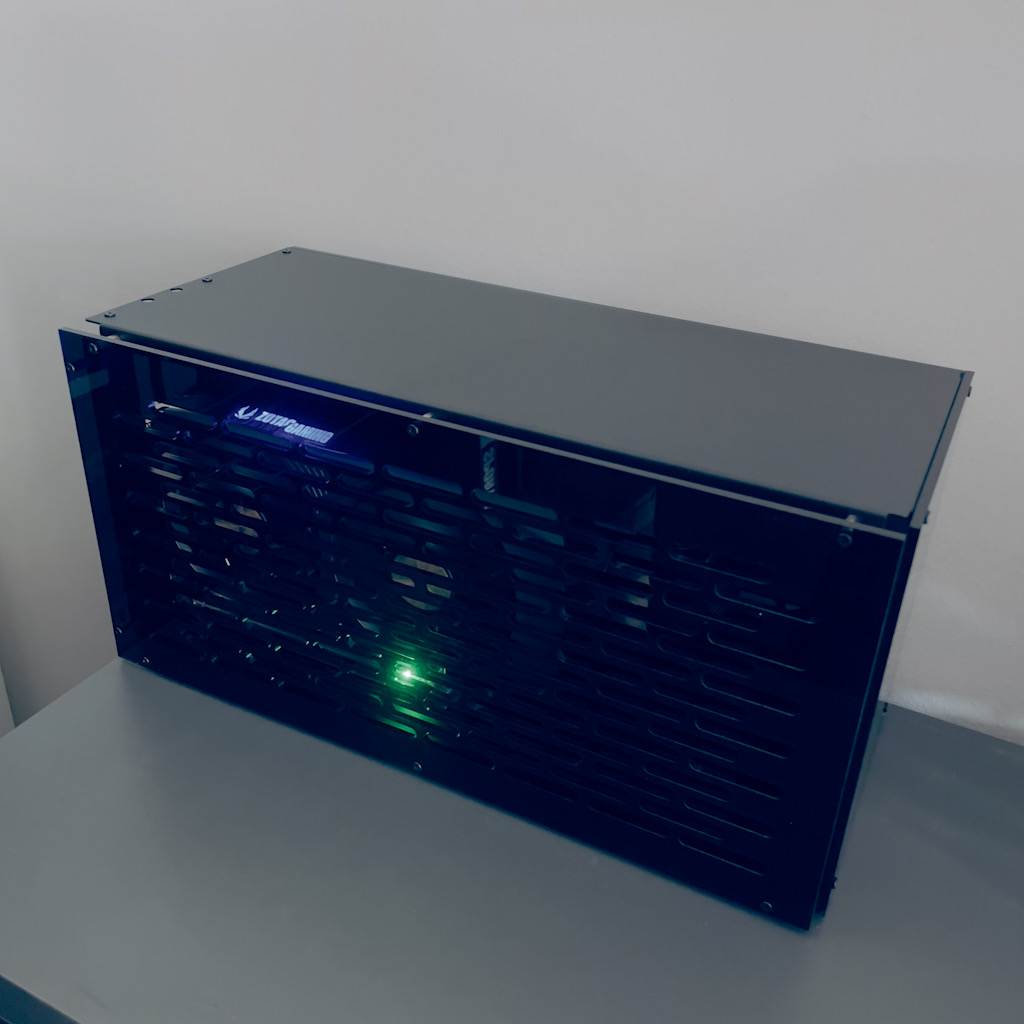
After testing a few things and being sure this setup would fit my “needs”, I decided to put the whole eGPU set into a case. I went for a mixed Metal / Acrylic case found on Aliexpress ; using the “dock TH3P4G3” keywords revealed a few - that mostly look the same. Both lateral sides have holes ; one side has a 1cm gap to allow air flowing out of the GPU to get out of the case.
Software dependencies
I did a few testings using various OSes. Long story short: I couldn’t get a working PyTorch environment in FreeBSD, I couldn’t passthrough the eGPU with NetBSD NVMM and various DEB-based Linux distros gave me headhaches when it came to installing the NVIDIA and Python stuff with tunings and patchings all over the packages repositories.
“Strength lies in differences, not in similarities.”
Slackware Linux 15.0 is already running on the target machine (GM1), so I concentrated on it.
BIOS parameters
By default, the GPU did not attach to any Linux system ; only the
thunderbolt adapter was visible. This only happened on Linux - it worked
OOTB on Windows. This is because Thunderbolt comes with its own security
shit system. Have a look at Scott Long’s talk about Thunderbolt on
FreeBSD
.
He explains it better than I would do here. You can also read the
ArchLinux
wiki
.
Before configuring the BIOS, the eGPU would make regular click noises and the LED would switch from green to blue. This is exactly what happens if you turn it off and on and off and on using the switch…
On the ThinkPad X280, hit <F1> to enter the BIOS Setup Utility. Go to
Config > Thunderbolt (TM) 3 and set Thunderbolt BIOS Assist Mode to
Enabled.
Set to Enabled only to support Linux and Windows 10 prior to version 1709.
The Security Level can also be set to No Security, User Authorization, Secure Connect and Display Port and USB. See the
Hotplug section to decide which one to use.
On the Topton GM1, hit <F2> to enter the BIOS Setup Utility. Go to
Advanced > Thunderbolt (TM) Configuration and set PCIE Tunneling over USB4 to Enabled and USB4 CM Mode to whatever suits your need.
Firmware CM only sets security level to None whereas Software CM first
sets security level to User. Once again, this will impact Hotplug.
eGPU Hotplug
When the machine cold boots and the eGPU is connected, the whole dock and GPU set is attached to the OS. However, when I was unplugging/plugging back the eGPU, or turning it off/on, I couldn’t get it back connected until I reboot.
This can be solved by turning “No Security” in the BIOS configuration. If the security level is set to “User” in the BIOS, a tool is needed to authorize the eGPU back to the system. On a Linux system, the security level can be indicated using the following command:
# cat /sys/bus/thunderbolt/devices/domain0/security
user
When the eGPU connects properly, you can see the NVIDIA card in the PCI list:
# lspci | egrep -i 'thunderbolt|nvidia'
00:07.0 PCI bridge: Intel Corporation Alder Lake-P Thunderbolt 4 PCI Express Root Port #2 (rev 04)
00:0d.0 USB controller: Intel Corporation Alder Lake-P Thunderbolt 4 USB Controller (rev 04)
00:0d.3 USB controller: Intel Corporation Alder Lake-P Thunderbolt 4 NHI #1 (rev 04)
03:00.0 PCI bridge: Intel Corporation JHL7540 Thunderbolt 3 Bridge [Titan Ridge DD 2018] (rev 06)
04:01.0 PCI bridge: Intel Corporation JHL7540 Thunderbolt 3 Bridge [Titan Ridge DD 2018] (rev 06)
04:02.0 PCI bridge: Intel Corporation JHL7540 Thunderbolt 3 Bridge [Titan Ridge DD 2018] (rev 06)
04:04.0 PCI bridge: Intel Corporation JHL7540 Thunderbolt 3 Bridge [Titan Ridge DD 2018] (rev 06)
05:00.0 VGA compatible controller: NVIDIA Corporation Device 2805 (rev a1)
05:00.1 Audio device: NVIDIA Corporation Device 22bd (rev a1)
19:00.0 USB controller: Intel Corporation JHL7540 Thunderbolt 3 USB Controller [Titan Ridge DD 2018] (rev 06)
When the TB Security Level is set to “User”, you can use a userland tool to authorize the eGPU. It doesn’t ship with Slackware by default ; and requires a specific Rust version:
# sbpkg -i rust16
# export PATH="/opt/rust16/bin:$PATH"
# export LD_LIBRARY_PATH="/opt/rust16/lib64"

# git clone https://github.com/intel/tbtools.git
# cd tbtools
# cargo build
# cargo build --bin tblist --bin tbdump
# cargo install --path .

# ~/.cargo/bin/tblist
Domain 0 Route 0: 8087:463e INTEL Gen12
Domain 0 Route 1: 8086:0002 Intel Tamales Module 2
You can now see the state of the Thunderbolt device:
# ~/.cargo/bin/tblist -Atv
/:  Domain 0
      Type: Domain
      Security Level: User
      Deauthorization: Yes
      IOMMU DMA protection: Yes

    Domain 0 Route 0: 8087:463e INTEL Gen12
      Type: Router
      UUID: d6be8780-41ce-c2de-ffff-ffffffffffff
      Generation: USB4

    Domain 0 Route 0 Adapter 1 Index 1: 8087:15ee
      Type: Retimer
      NVM version: 10.0

        Domain 0 Route 1: 8086:0002 Intel Tamales Module 2
          Type: Router
          Speed (Rx/Tx): 40/40 Gb/s
          Authorized: No
          UUID: c1010000-0072-741e-03c4-fed99ec2a108
          Generation: Thunderbolt 3
          NVM version: 64.0
The “Authorized: No” value is the reason the eGPU does not attach back to the system. Authorize the device and watch it attaching to the system:
# ~/.cargo/bin/tbauth -d 0 -r 1

# ~/.cargo/bin/tblist -Atv
/:  Domain 0
      Type: Domain
      Security Level: User
      Deauthorization: Yes
      IOMMU DMA protection: Yes

    Domain 0 Route 0: 8087:463e INTEL Gen12
      Type: Router
      UUID: d6be8780-41ce-c2de-ffff-ffffffffffff
      Generation: USB4

    Domain 0 Route 0 Adapter 1 Index 1: 8087:15ee
      Type: Retimer
      NVM version: 10.0

        Domain 0 Route 1: 8086:0002 Intel Tamales Module 2
          Type: Router
          Speed (Rx/Tx): 40/40 Gb/s
          Authorized: Yes
          UUID: c1010000-0072-741e-03c4-fed99ec2a108
          Generation: Thunderbolt 3
          NVM version: 64.0
TADAAAA! Honestly, it took me two days to get to this point 😓
nVidia drivers and utility
The eGPU is connected to a headless server. I don’t use it with a graphical interface. But CUDA librairies are still required by software. As a dependency, the NVIDIA drivers are installed and you get a couple of handy utilities to look at what happens on the GPU.
# sbpkg -i cudnn

# nvidia-smi
# watch nvidia-smi
ffmpeg with H264/H265/NVIDIA support
By default, on Slackware Linux 15.0, ffmpeg is not compiled with H264, H265 and NVIDIA encoding/decoding support. It wouldn’t be optimized to not enable it now that we have the RTX power.
# sbpkg -i x264 x265

# wget https://slackbuilds.org/slackbuilds/15.0/libraries/nv-codec-headers.tar.gz
# tar xvzf nv-codec-headers.tar.gz
# cd nv-codec-headers
# wget https://github.com/FFmpeg/nv-codec-headers/releases/download/n11.1.5.3/nv-codec-headers-11.1.5.3.tar.gz
# VERSION=11.1.5.3 ./nv-codec-headers.SlackBuild
# installpkg /tmp/nv-codec-headers-11.1.5.3-x86_64-1_SBo.tgz
# cd -

# wget -np -m https://ftp.lip6.fr/pub/linux/distributions/slackware/slackware64-15.0/source/l/ffmpeg/
# cd ftp.lip6.fr/pub/linux/distributions/slackware/slackware64-15.0/source/l/ffmpeg/
# chmod +x ffmpeg.SlackBuild
# X264=yes X265=yes ./ffmpeg.SlackBuild
# installpkg /tmp/ffmpeg-4.4.1-x86_64-2.txz
# cd -
The nv-codec-headers what tricky because not any version works ; it
seems to depends on the NVIDIA drivers.
It is possible to verify that ffmpeg uses the NVIDIA card by issuing such a conversion command:
# ffmpeg -y -vsync 0 -i IMG_0624.MOV -c:a copy -c:v h264_nvenc \
  -pix_fmt yuv420p -b:v 5M IMG_0624.mp4
During the transcoding, ffmpeg appears in the processes section of
watch nvidia-smi.
Generative AI software
There are plenty of generative AI software. I am more interested by the image and audio targetted ones.
Disclaimer: All those software use Python. Nearly each require a specific Python version and set of libraires. So I’m using virtual environment for each of them. Also, it seems people broadly use miniconda. But I have nearly to 0 Python-knowledge and only learned how to use the standard Python venv. Do it your preferred way.
pinokio
I’m not using it here as I run headless, but pinokio was a really easy and smart way to start using AI stuff. This may be an option for you.
roop-unleashed
Uncensored Deepfakes for images and videos without training and an easy-to-use GUI.
This software allows face swapping in photos and videos.
So far, it works best with Python 3.10 ; which is not part of Slackware Linux 15.0. To install it, simply build from source:
# wget -m -np https://ftp.lip6.fr/pub/linux/distributions/slackware/slackware64-current/source/d/python3/
# cd ftp.lip6.fr/pub/linux/distributions/slackware/slackware64-current/source/d/python3/
# chmod +x python3.SlackBuild
# mv Python-3.11.9.tar.xz _Python-3.11.9.tar.xz
# wget https://www.python.org/ftp/python/3.10.14/Python-3.10.14.tar.xz
# ./python3.SlackBuild
# installpkg /tmp/python3-3.10.14-x86_64-1.txz
# cd -
Then, the installation is as simple as described in the documenation .
# mkdir roop-unleashed && cd roop-unleashed
# git clone https://github.com/C0untFloyd/roop-unleashed.git src

# python3.10 -m venv pyenv
# source pyenv/bin/activate

# cd src
# pip install -r requirements.txt
# python run.py
Browse to http://example.com:7860 and start inserting you face in your preferred movie clip. I tried replacing Big Buck Bunny ’s face but the result was pretty bad. Also, replacing face in anime pictures using a photo source does not produce great results either. This software does not seem to provide enough intelligence to operate on something else than “real looking” material, AFAIK.
Fooocus
Fooocus is an image generating software. Fooocus is a rethinking of Stable Diffusion and Midjourney’s designs.
The application generates images from your input text. It is mainly the same thing as Bing Image Generator, but self-hosted.
The installation doc is available here
# mkdir fooocus
# cd fooocus

# python3.10 -m venv pyenv
# source pyenv/bin/activate

# git clone https://github.com/lllyasviel/Fooocus.git src
# cd src

# pip install -r requirements_versions.txt
# python entry_with_update.py --listen
From now on, browse to http://example.com:7865 and start using it.


I got the “RuntimeError: Expected all tensors to be on the same device, but found at least two devices, cuda:0 and cpu!” error. It seems to be
related to system swap… So I went
# swapon -s
Filename                                Type            Size            Used            Priority
/dev/nvme0n1p2                          partition       16777212        5376            -2

# dd if=/dev/zero of=/swapfile bs=1024M count=40
# chown root:root /swapfile
# chmod 0600 /swapfile
# mkswap /swapfile
Setting up swapspace version 1, size = 40 GiB (42949668864 bytes)
no label, UUID=023bb884-1e29-4a68-8ea0-2165849c46ee
# swapon /swapfile
and it worked. But in fact, this was not needed. I was just using 60% of the GPU VRAM with another process. When Fooocus gained access to the full GPU memory, it went ok without the additionnal swap. It probably means that you need at least 8GB of VRAM to use it.
AudioCraft
AudioCraft is a PyTorch library for deep learning research on audio generation.
This software generate music from your input text.
Spoiler Alert: the results really sound like a 3-years-old child with a flute. Or maybe one has to learn to use it…
# mkdir audiocraft
# cd audiocraft
# git clone https://github.com/facebookresearch/audiocraft.git src

# python3.10 -m venv pyenv
# source pyenv/bin/activate

# cd src
# pip install -r requirements.txt
# pip install -U audiocraft

# python demos/musicgen_app.py --listen 0.0.0.0 --server_port 7900
Browse to http://example.com:7900 and start making noise.
Power consumption and metrics
I’ve always been concerned with noise. These days, I also tend to monitor power consumption. I’ve already started to limit the number of pluggued things at home, or use some that need less power. So I had to have a look at the eGPU in this particular use-case.
I’ve been using nvidia-smi, nvtop and an a Smart Plug to look at
metrics.
# sbpkg -i nvtop

# watch nvidia-smi
# nvtop
At IDLE time, system tools announce 3 to 4 W for the NVIDIA card. The Smart Plug mesures 20 W. The GPU keeps a temperature of 32°C and its fans stop spinning.
BTW, it was about 26°C in the room while I ran the tests.
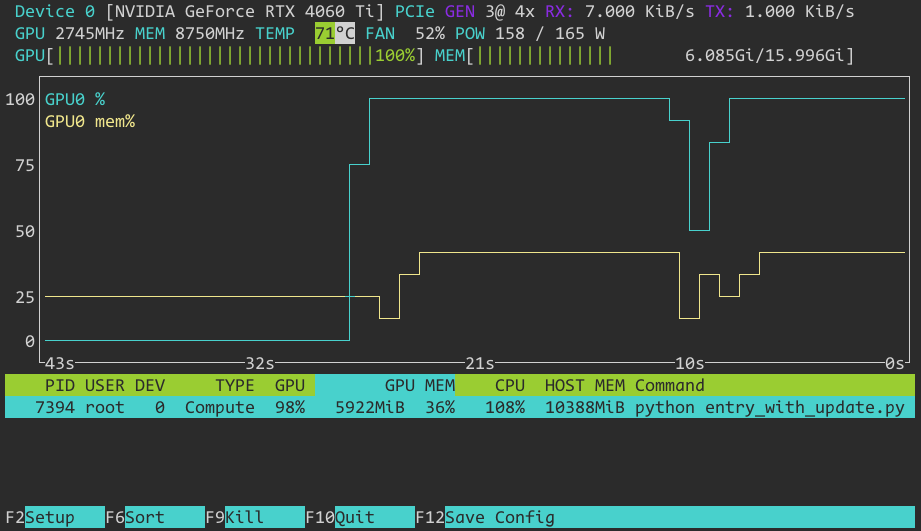
Using Fooocus to generate 2 images takes about 17 seconds. The GPU compute is used at 100% while memory never exceeds 6GB. A remaning 2.6GB of memory is never released after the image generation has finished. Power consumption from the system POV is 158W while the Smart Plus indicates 168W ; during the GPU pic usage. The fans spin as bit and stop when temperature is about 46°C.
Using roop-unleashed to replace Austin Power’s face from (4) movie captures
(using GPEN post-processing and 6 threads) took about 1.5s per image.
The GPU compute went up to 100% usage and 8GB of VRAM were required.
About 100W were required. The temperature didn’t go over 50°C.
When tested on a 1 minute long video clip, replacing a single face took
03:44 (7.62frames/s). The GPU worked at 100% and 13GB of VRAM were used.
The temperature didn’t exceed 47°C and fan spinned at 47%. The system
tools indicated a 124W power consumption when the Smart Plug said 140W.
Using MusicGen to produce a 120 seconds audio track took 2 minutes and 57 seconds. The GPU went to 100%, 5GB of VRAM were required and the temperature didn’t go over 64°C - fan kept spinning at 42%. Power usage from the system tools POV was about 106W ; 120W from the Smart Plug POV.

Last word about the noise. I don’t have tool to mesure the effective dB. Compared to my ThinkPad X1 Carbon when watching videos with Firefox/OpenBSD on YT, the whole eGPU emit about the same sound level. The PSU fan is deeper and quieter than the GPU fans spinning. That said, the GPU fans don’t spin during 100% of the rendering processes. Furthemore, the GPU fans stop spinning less that an minute after the rendering is finished.
Conclusion
There is no discussion at how fast the GPU rendering speed is compared to pure-CPU rendering. I also tested a 2017 MacBook Pro 15-inch with a Radeon Pro 560 4GB and it was still slower. Like expect hours of rendering when the NVIDIA GPU only takes minutes.
Looking at the power consumption, it seems my PSU is oversized. If I had knew this sooner, I would probably have bought a fanless 400W one. That would have add to silence when the GPU fans don’t spin while still providing enough power to the GPU.
The case is nice. I found several time that people had issues with it when it comes to hotplugging and that Razer Core X would be a better choice on Linux. Seems to me setting the proper Thunderbolt Security Level and installing the system tools are the real trick.
I’m not 100% satisfied with the results of those Generative AI tools. At least when it comes to using defaults. There seem to be plenty to tweak. I think you probably also have to learn using those tools ; same at what happens with Gimp or LibreOffice if you want to do more than just basic stuff.
That’s all for me. ‘Hope you found this reading useful.